Thursday 28 June 2007

Rice Cooker ~ Claypot Chicken Rice

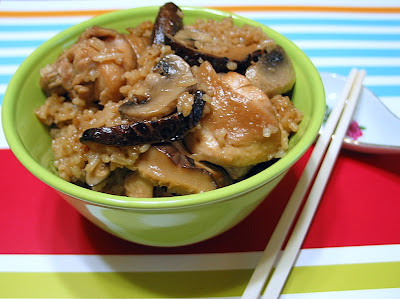
This was our dinner tonight...Claypot Mushroom Chicken Rice.


Since the start of the week, I have been involved in some "odd jobs" and will still be busy right till next week, I could hardly find time to do any baking :(

This is a super simple, fuss-free, one-pot dish which I have improvised over the past 1.5 years. It is one of the first few simple meals which I could handle ever since I became the full-time COO of my house (aka housewife) ;)

This is so simple, even the taste is so simple (nothing fabulous) that I didn't even thought of posting it. Whenever I am short of time, or, pure lazy, I will make this dish.

All you need to do is to marinate the chicken pieces (I used half a chicken) beforehand with some seasonings such as: black soya sauce, salt, pepper, sesame seed oil and a few slices of ginger. The chicken will taste better if you can marinate it overnight.

Just before you are ready to cook the dish, cut mushrooms such as fresh button mushrooms, dried or fresh shiitake mushrooms into slices, wash the rice and place everything (rice, mushrooms, marinated chicken) into the rice cooker pot. Add in the amount of water required to cook the rice (eg 2 cups rice will need 2 cups of water). Stir the ingredients to mix well. Cook using the rice cooker. Give it a stir in between the cooking cycle. Once the cooking cycle is completed, fluff the rice a little and the dish is ready to be served!

I am not able to provide details on how much salt, soya sauce to add...as I usually cook by "feeling"...I simple add the amount which I "think" is right. As a result, sometimes the chicken rice could be more saltish while other times the taste was just right! Occasionally the rice could be a little too hard as I didn't add enough water. Since my dear ones are not picky eaters, so far they have not made any complaints. hehe!

I used to stir-fry the chicken and mushrooms a little before I cook them in the rice cooker. Ever since I tried putting everything raw into the rice cooker to cook, I have omitted this step completely. So, there's really not much cleaning and washing up to be done :)


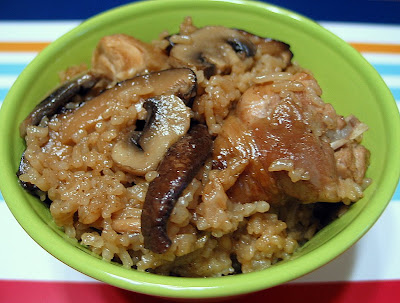
A closed-up of tonight's dinner, the rice appeared oily, but it was not. I took this picture right under a lamp, the reflections made the whole dish looked so oily! As you can see, the rice was a bit too soft and sticky...I must have added too much water, oops!

Friday 22 June 2007

Milo Double Chocolate Chip Muffins

It has been some time since I last baked muffins. At one time I was crazy over muffins before the bread making craze took over. I still like baking muffins since they are much easier and straight forward to make as compared to cakes or bread. They are also very versatile as you can always experiment it with different ingredients.

Inspired by a friend's triple chocolate muffins, I made a batch of Milo flavoured chocolate chip muffins for the kids and my niece.


I adapted the recipe from a cookbook, Williams Sonoma's Muffins, and replaced some of the flour with Milo. This is the first time I've used Milo in my bakes. I grew up drinking Milo everyday...my breakfast (as far back as I could remember) was always a cup of hot Milo with a slice of bread. It was not until I stepped into the working world that I changed my daily beverage to coffee. Even then, I still drink Milo on a very regular basis. Nowadays, it has almost become a comfort drink for me, especially when I am not feeling well. I remembered those winter holidays I spent at my sis place in the states, I would not go to bed before drinking a cup of hot Milo. It really warms up the whole body in those cold, freezing nites.


Although I have already tried several muffin recipes, this is the first recipe that I have used which adopts the "rubbing-in" method. Most of the muffins I have tried used either the creaming method (cream butter with sugar) or the standard muffin method where the wet ingredients (where butter is melted) are mixed with the dry ingredients. For this recipe, the butter is rub-in with the self-rising flour, before the wet ingredients are added to form the batter. I have also used both the dark chocolate chips and white ones...simply because I need to use up the white chocolate chips before they expire ;p

I was very surprised at the texture of the muffins. It was super soft and moist. These are one of the best muffins I have baked. The kids love the sweetness and the added chocolate chips. I could even distinguish the familiar Milo smell when my kitchen was 'engulfed' with the sweet aroma from the freshly baked muffins.


Ingredients:
(makes 9 big muffins)

270g self-rising flour
30g Milo
1 teaspoon baking powder
55g butter
80g sugar
150g milk or semisweet chocolate chips
2 eggs, lightly beaten
225ml milk
1 teaspoon vanilla extract

Method:

  1. Preheat oven to 200 deg C. Grease a 12-cup muffin pan or line with paper muffin cups.

  2. Mix the flour, Milo and baking powder in a large bowl.

  3. Rub in the butter until the mixture resembles bread crumbs.

  4. Stir in sugar and chocolate chips.

  5. In a small bowl, whisk together the eggs, milk and vanilla extract. Pour the mixture all at once into the dry ingredients. Mix quickly until just blended. Do not over mix.

  6. Spoon batter evenly into the prepared muffin pan and bake for 20mins or until golden brown, and a skewer inserted into the centre comes out clean.

  7. Cool in the pan for 10mins then transfer to a wire rack to cool completely.

Wednesday 20 June 2007

Chocolate Hazelnut Bread


When I first came across this bread recipe that uses chocolate chips and hazelnuts, I almost wanted to try it out immediately. It was put on hold as I didn't have any chocolate chips or hazelnuts left. However, this recipe has been at the back of my mind all the while...I finally got a pack of chocolate chips and hazelnuts when I dropped by Phoon Huat recently. Since it was a few weeks before I last read the recipe, I got the wrong type of hazelnuts! The recipe calls for chopped hazelnuts, but I bought home a pack of grounded hazelnuts :'( I went ahead with it, thinking that there shouldn't be much difference between chopped and grounded hazelnuts.


This bread recipe is for a bread machine...as such it is quite a simple and straight forward loaf to bake. I only got a little worried just after I added in the grounded hazelnuts and chocolate chips. The dough didn't seem to be able to blend in the nuts and chips well. Fortunately, after the second kneading cycle was completed, all the chips and nuts were fully incorporated into the dough. In fact, most of the chips were already melted into the dough.

It was only when the bread was almost baked, I then realised that I didn't set the loaf size and crust setting! As the crust was almost dark browned, I stopped the machine 5 mins earlier. I wasn't sure whether it was the wrong setting, or it was meant to be, the crust was a little hard and crisp...just like the crust texture of a country loaf.

Too bad with the use of a wrong type of hazelnuts, I couldn't taste the grounded hazelnuts in the loaf at all...and the bread wasn't really sweet as what I expected. Nevertheless, the bread tasted marvellous when served as a toast with jam :P

Ingredients

200ml semi-skimmed milk (I used low fat fresh milk)
3 tablespoon melted butter, cooled
1 large egg, beaten
1 1/2 tablespoon sugar
1 teaspoon salt
450g bread flour
1 1/4 teaspoon instant or fast acting dried yeast
75g chocolate chips
50g chopped toasted hazelnuts

Method:
  1. Pour milk into the pan of the bread machine, followed by melted butter and egg. Add sugar and salt. Cover with the flour and sprinkle the yeast over.
  2. Fit the pan into the bread machine and set to BASIC white programme. Select 1 lb or 1.5lb loaf size and set to light or medium crust setting (depend on your preference).
  3. Add the chocolate chips and nuts when the machine beeps.
  4. Once baked, remove the loaf from the pan and let cool on a wire rack for at least an hour before slicing.

Recipe Source: The Breadmaker Bible by Karen Saunder

Monday 18 June 2007

Peach Layered Sponge Cake

We decided to make a cake for my husband to celebrate Father's Day. Although I've learned how to bake a sponge cake, I am always lost when come to cake decorating. The boys and I spent some time discussing before we decided that I could make a Darth Vader chocolate transfer and use it for to decorate the cake. My hubby is a fan of star wars...and he likes using various Darth Vader icons in his PC. So, with the help of a Darth Vader's mask, I drew up a template to make the chocolate transfer. I melted some chocolate and piped the outline of Darth Vader over the template. I was quite satisfied with the result and kept the chocolate transfer in the freezer before baking the sponge cake.

I use the same sponge cake recipe which I did earlier but reduced the sugar amount by half, and simply filled the layers with whipped cream and canned peach slices. When I was ready to transfer the chocolate Darth Vader template over to the the cake top...it started to melt and broke into pieces :'( This was despite that I used a metal spatula to transfer the chocolate, I didn't even use my bare hand as I knew the warm from my hand would melt the chocolate. Guess, I can forget about using chocolate transfers in cake decoration unless I have a cold-room in my house!

Since I didn't want to have a plain-looking cake, I tried piping wordings on the cake. Then, I piped a supposedly caricature of my hubby...but it didn't turn out as expected...urrrgh! the decoration really cannot make it.

Was quite upset over it, but when my hubby saw it, he just smiled and assured me it's the thots that count. To proof his gratitude, he finished up three slices at a go ;p


I do like the texture of the sponge cake though...it was light, soft and a little moist. Over all the cake tasted sweet and refreshing with the peach slices and whipping cream.


Ingredients:
(make a 20cm round cake)

4 eggs, bring to room temperature
100g caster sugar
4g salt
140g cake flour
30g salad oil**
30g fresh milk

filling & frosting:
1 cup non-dairy whipping cream
1 can peach slices

Method:
  1. Sift cake flour, set aside. Grease and line a 20cm round pan, set aside. Pre-heat oven to 180degC. Position rack at the lower bottom of the oven.
  2. With an electric mixer, whisk eggs and sugar & salt on HIGH speed for about 5 to 7mins, until the batter double in volume and is ribbon-like (the batter should leave a ribbon-like texture when the beater is lifted up). Turn to LOW speed and whisk for another 1 to 2 mins. Whisking at low speed helps to stabilise the air bubbles in the batter.
  3. Add sifted cake flour into the batter. With a spatula, gently fold in the flour until well blended.
  4. With a spatula, mix about 1/3 of the batter with the salad oil in a separate bowl. Fold in this mixture into the remaining batter. This method will help to ensure the oil will be fully blended and at the same time will not deflate the batter.
  5. Add in fresh milk and fold in gently with spatula.
  6. Pour the batter into the pan and bake for 35 mins, or until a skewer inserted in the centre comes out clean. Unmold and cool completely.
Assemble the cake
  1. With an electric mixer, whip the whipping cream still stiff.
  2. Slice the cake horizontally into 3 layers. Place one of the cake layers cut-side down on a cake plate.
  3. Spread the whipped cream over the layer. Arrange rings of peach slices to cover the whole layer. Fill with some more whipped cream. Top with the second cake layer, cut-side up.
  4. Repeat step 3 for the second cake layer. Top with the third layer.
  5. Spread the whipped cream over the top and side of the cake. Decorate as desired.
(**Note: Salad oil is a term which I have translated from the Chinese recipe. It refers to vegetable oil. You can use sunflower oil, canola oil, olive oil, as long as the type of oil you use doesn't give a strong smell.)

Thursday 14 June 2007

Pork Floss Loaf

A couple of weeks ago, we planned to have breakfast at Toastbox...a local cafe chain that offers toasts with pork floss toppings and serves really good kopitiam-style coffee. However, we were too lazy and woke up way too late. To save myself from the cravings for pork floss toasts, I bought a loaf of bread from Toastbox that day and tried to replicate it the following morning.

Here's my replica of the pork floss toast. I lightly toasted the bread, added some butter, and cut the slice into 9 squares. Then topped with pork floss and drizzled some condensed milk over. It tasted not bad, I really liked the bread...very soft and came with a nice milky fragrance.


I also tried making the milo toast. Actually I have not tasted milo toast from Toastbox before...so I wasn't sure whether this came close to the real thing?


It was almost 3 weeks ago since I last baked a loaf of bread. I simply couldn't resist the urge to bake a loaf yesterday. I used a Pullman bread recipe to bake a plain loaf with pork floss filling.


The bread tasted very good when fresh from the oven, the texture was rather soft and light. The crumb was very airy as well. However, when left overnight, without toasting or warming it, I find the bread a little dense and slightly chewy. So it's advisable to toast the bread before serving, if it is left overnight. I will certainly add more pork floss next time, as I find the filling a little too thin.

Ingredients:
(adapted from Bread Magic)

330g bread flour
30g caster sugar
1/2 teaspoon salt
1 1/2 teaspoons instant yeast
190ml fresh milk
25g butter
some pork floss

Method:
  1. Place all ingredients in the bread pan of the bread machine, according to the sequence stated in the instruction manual of your bread machine. Select the Dough function to knead and proof the dough (about 1hr 30mins). You may also choose to let the machine do the kneading and remove the dough to proof at room temperature.
  2. Take out the dough and punch out the gas produced. Shape dough into a big ball. Let it rest for 10 minutes.
  3. Roll out the dough into a rectangle (about 15in by 8in) on a lightly floured work surface. Cover the dough with pork floss. Roll up like a swiss-roll and seal the edges tightly.
  4. Place dough, seam side down in loaf pan. Tuck in the sides underneath to give a neater look. Cover with a damp cloth and let proof for another 30mins or until the dough rise to about 80% of the loaf pan.
  5. Preheat oven to 180 degC and bake for about 25 - 30 minutes. Remove from oven and unmould immediately. Let the loaf cool off before slicing.


Wednesday 13 June 2007

Rokumonsen - 六文銭

After visiting the Sensoji at Asakusa and shopping at the Nakamise street, we decided to have lunch at this cook-it-yourself Okonomiyaki restaurant, as recommended by a travel guide book. The restaurant is called the Rokumonsen - 六文銭, literally, it means Six Cents. Of course the food there cost more than six cents!


According to the travel guide, there are two outlets in Asakusa...the main restaurant and a smaller outlet. Both are within walking distance from the Sensoji. Somehow, the map provided was not very detailed, we had to "ask" around before we could locate the main restaurant. As we don't understand or speak Japanese language, we could only used sign language when asking for directions. Hence, it took us a while to finally locate the restaurant. Guess what, it was closed for renovation! We had to make our way to the other smaller outlet...after missing a few turns and stopping to ask for directions, we finally found the outlet which was located on a side street on the second floor of a small building.


Once we settled down to our table (which was fitted with a hot plate), I ordered a few types of okonomiyaki and Monjayaki to try.

Okonomiyaki is a pancake-like dish that is cooked with batter and various ingredients such as diced seafood, meat and vegetables. The mixture of batter and ingredients is then cooked over a hot plate (teppan). The name of this dish means "cook what you like, the way you like" as okonomi means "what you like" or "what you want", and yaki means "grilled" or "cooked".

Monjayaki is somewhat similar to okonomiyaki, except that the batter is more liquid and runnier than okonomiyaki.

We requested the restaurant staff to show us how to cook the okonomiyaki since we had no idea how to cook it. There's a picture showing the steps, but they were all in Japanese.


The staff came with bowls of raw ingredients. She first oiled the hot plate with cooking oil and instructed us to mix the raw ingredients in each bowl. She then poured each bowl of raw mixture onto the hot plate. With the help of two metal spatulas, she pushed and shaped the pancakes.


We were left on our own to cook the Okonomiyaki and flipping them over when done. All the while, we were keeping an eye on how the locals at the other tables were cooking their dishes.


The staff then showed us how to brush the top of the Okonomiyaki with sauce, and finally, served with mayonnaise and topped with lots of dried bonito shavings.


The cooking method for Monjayaki is slightly different. The staff first poured the ingredients onto the hot plate...stir-fry a little, then made a hole in the middle of the ingredients before pouring in the batter.


The kids found it very entertaining just watching the cooking done right in front of them...with the sizzling and the confused looks written over their parents ;'p

The cooked Monjayaki...yum yum!


For dessert, we ordered the restaurant's speciality...fruit sherbets. There were lemon, orange, apple flavours to choose from.


The sherbets certainly cooled down the heat from the hot plate and the Okonomiyaki dish.

This was yet another fun dinning experience we had in Tokyo =)

Tuesday 12 June 2007

Japanese Ramen

I finally had a chance to taste authentic Japanese Ramen after a 10 year break! Although ramen is available at Japanese restaurants here, but most of the time, the taste simply couldn't meet those in Japan.

As recommended by a travel guide book, we had ramen at this interesting restaurant, Ichiran.


We liked the ramen so much that we went back to the same place three times during our 1-week trip in Tokyo recently. This restaurant is very popular as there's always a queue outside the outlet.

At many small eateries in Tokyo, you will need to purchase meal coupons from vending machines usually located just outside the restaurants. The staff will then collect the tickets from you and your meals will be served shortly. I thought this is really a very efficient method to run an eatery, as you don't need manpower to take orders and payment. Here's an example of a vending machine:


Examples of meal coupons:


It was indeed a "fun" dinning experience for us when we first went to Ichiran. After spending a few minutes figuring out how to use the vending machine, we bought our meal tickets and waited for empty seats. There's an electronic signboard which will indicate where the empty seats are located once the previous diners have left.


Inside the restaurant, each seat was divided into a small cubicle... with dividing boards separating each diner. There were only 2 tables which could seat four persons together. The rest were all cubicles.


There was a curtain in each seat which would separate you from the staff, so that you could enjoy your ramen in complete privacy! The staff would only lower the bamboo curtain when your ramen was served.


Once we settled down to our small cubical like seats, we got to fill up an order sheet to personalise how we wanted our ramen to be done. We could choose whether to have a stronger flavour of the soup, the tenderness of the noodles, whether to add spring onions, etc.


When we were done with the order sheet, we have to place it together with the meal coupons on the table and press the red button which was fixed at the front of the table. The staff came promptly to collect our orders.


We didn't have to wait very long before a yummy, pipping hot bowl of ramen was served.


In case you are feeling very hungry (or greedy as in our case), you can purchase a meal coupon to have additional noodles added. The interesting thing is, the additional portion will not be added to the bowl of ramen right away. You will be given a metal plate when you give the staff your coupon for the additional portion. When you are ready for the additional noodles, you got to put the metal plate on the button in front of the table. A ring tone will buzz, and one of the staff will come to collect the plate. Shortly, the staff will come with a bowl of noodles (without the soup) for you to top up your bowl. Thus, the trick is to make sure you don't finish up your soup before you order for your additional noodles. I only managed to figure out the entire ordering system after my second visit!

By the way, the kids love the tune of the ring tone (do re mi, mi re do, do re mi re do re) and have been singing it through out our trip! I was pleased to hear the ring tone myself as I first heard it while watching a VCD of Chibi Maroko-chan, one of my many favourite cartoon characters :)


The tenderness of the noodles was just perfect and the soup was really delicious!


We have yet to find out what the Japenese words meant inside the empty bowl. Will probably do so, if I have the chance to visit Tokyo again :p

Friday 1 June 2007

Simple Meals

As a stay-at-home-mum, one the most challenging tasks to me is to prepare healthy and delicious meals for the family each day. Since I am not a good cook, dishes have to be simple enough for me to handle, and not too time consuming to prepare. Fortunately, my love ones are not picky eaters, they will eat whatever that are served on their plates. On the other hand, with them being so forgiving, my cooking skill never seems to improve ;)

The usual lunch dishes that I came up with do not go beyond fish porridge, chicken porridge, minced pork porridge, fried noodles, noodle soups, macaroni soup and simple pasta dishes.

One of their favourite dishes is pasta in creamy sauce. I have tried cooking pasta with store-bought sauces and homemade sauces. So far, I could only say that they were just edible, taste wise, I have yet to make a good pasta dish :(


Made baked macaroni for lunch today. As I was short of time, I prepared it with canned mushroom soup. I simply boiled some macaroni...stir-fried fresh shiitake mushrooms with garlic, and added some sliced chicken franks. The canned soup was then heated up before all the ingredients were mixed together and placed in a dish. I topped it with some cheese and baked until the cheese turned golden brown.


Well, it wasn't really a very healthy dish as canned soups and chicken franks are relatively high in sodium. The only healthy ingredients to "compensate" the dish were the fresh mushrooms and cheese. Healthy eating aside, the three of us polished off the food in no time :)