Monday 31 March 2014

Kopitiam Milk Buns

I have to admit I am really slow in keeping up with the joneses...


not in the social sense, but in the world of 'cyber baking' (wonder whether there is such a term?).

These Kopitiam Milk Buns are all the rage for the past year but I only got to discover it recently. I am not able to keep up with the latest baking trends as I have been spending less time blogging or surfing the net. It doesn't help that I don't own any social media accounts such as facebook, twitter or what have you. I am oblivious to what's 'hot', what's 'current'. Hmmm, actually, I am happy to be a frog in the well, baking the usual old-fashioned muffins, bread and cakes, unwilling to move out of my comfort zone and definitely lacks motivations to try new things (^_^")


I only happened to stumble upon this popular kopitiam milk buns while searching for bread buns recipe that would yield close to those buns which I will always order whenever I have the chance to get my breakfast kopi fix at Koufu foodcourt.


The recipe looks really promising and I took the plunge. The first thing to do was to prepare the sponge dough which has to be left to ferment in the fridge for at least 12 hours. It was quite easily done by hand...simply by mixing flour, milk and yeast. The sponge dough was rather dry and tough...just as what it is meant to be. I left it to chill overnight and finished the next step of kneading the dough with my Bosch mixer. It took about 20 to 25mins of kneading before I was satisfied that the dough had indeed become smooth and elastic.


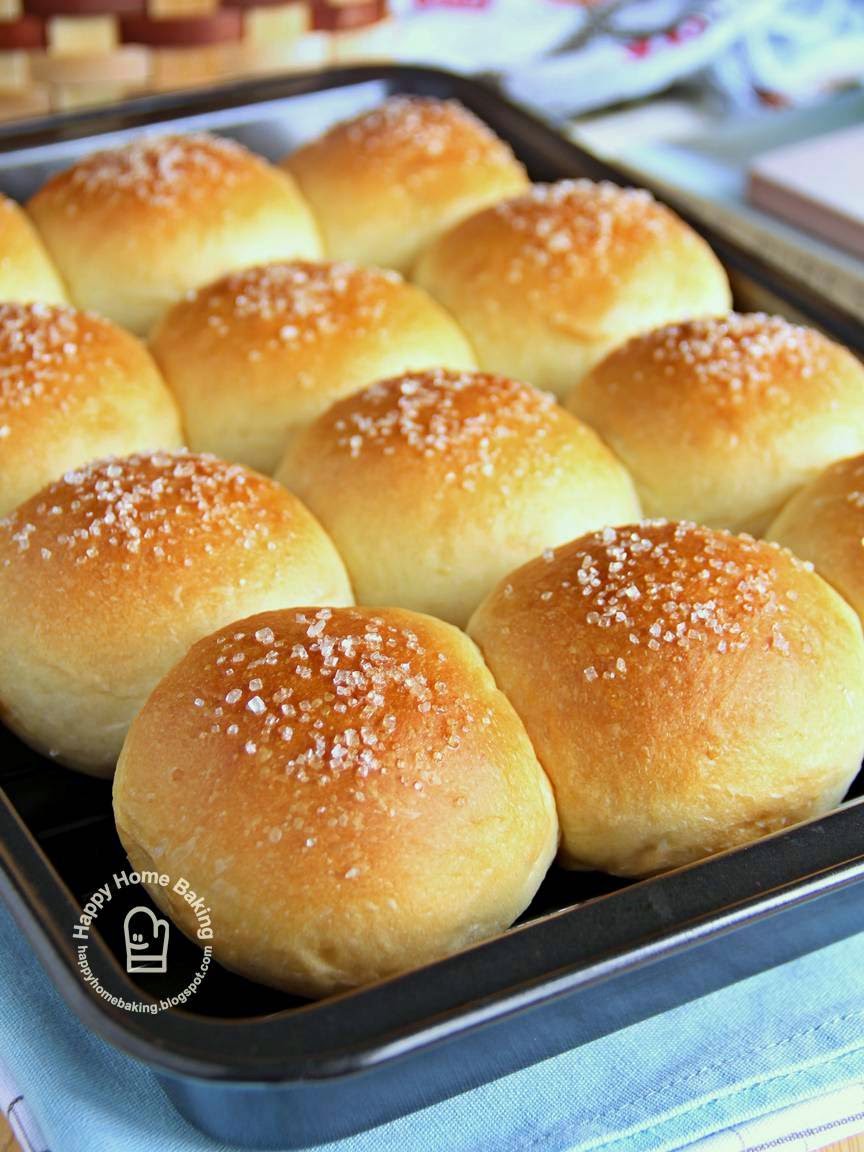
I divided the dough into 12 portions which yield smaller buns. On hindsight, I should have made do with just 9 portions to get bigger buns so that I could toast them and slap on generously with kaya and butter.


I sprinkled the top with some coarse granulated sugar and the buns were a real treat fresh out of the oven. The texture was very soft and fluffy and it taste good even without any fillings. The only complain I have is that these buns didn't keep that well. Despite storing them in an air tight container, the soft texture deteriorated significantly when left over night. By comparison, they were not as soft as those bread buns made with tangzhong. I baked a batch of tangzhong bread buns right after and true enough they remain soft on the third day whereas these kopitiam milk buns were only good freshly baked. I am not sure whether I have done anything wrong while preparing the dough? Nevertheless, the recipe is still a keeper which I will go to if I know we would be able to finish all the bread buns with no left overs ;)


Kopitiam Milk Buns

Ingredients:
(makes 12)

sponge dough:
214g bread flour
128g full cream milk
2g instant yeast

  • Place bread flour and instant yeast in a mixing bowl. Make a well in the centre and add in the milk. Mix with hand to form a dough. (Note: The dough is quite dry and hard.) Cover with cling wrap and leave in the fridge for at least 12 hours or overnight.

main dough:
92g bread flour
12g milk powder
61g caster sugar
5g salt
5g instant yeast
12g full cream milk
30g egg (lightly beat an egg, weight 30g for the dough, and reserve leftover for egg wash)
45g unsalted butter

some coarse granulated sugar
egg wash (mix left over egg from main dough with 1 tablespoon water)

Method:
  • When ready to use, tear the sponge dough into pieces and place in the mixing bowl of a stand mixer. Add the rest of the ingredients except the butter. Knead with a dough hook at high speed for about 10mins or until the mixture becomes smooth dough.
  • Add in the butter and continue to knead at high speed for another 15mins or until the dough becomes smooth and elastic. To test whether the dough is ready, pull and stretch a portion of the dough. It should be elastic, and can be stretched into a thin membrane without tearing/breaking apart easily.
  • Smooth the dough into a round ball. Cover with cling wrap or a damp cloth and let it rest for 15mins. 
  • Divide dough into 12 portions (50g each). Roll each portion into round balls and place on a greased (or lined with parchment paper) baking tray. Space doughs two inches apart to allow them to expand. Cover with damp cloth or cling wrap and leave doughs to proof for about 60mins, or until double in size. 
  • Brush top with egg wash and sprinkle with coarse granulated sugar.
  • Bake in pre-heated oven at 180 deg C for 12 mins or until golden brown. Remove from oven and transfer to wire track to let cool. Once cool, store immediately in an airtight container.
Recipe source: adapted from Vinnie Baking Paradise

Sunday 23 March 2014

挞入我心


When I met up with fellow blogger pal Sherlyn to pass her some books which my children have outgrown, she was so kind to give me a batch of her freshly baked egg tarts. I was very touched and was totally intrigued by her cute mini egg tarts. You need a pair of very skilled hands to be able to bake something so exquisite and delectable! Her homemade goodies were so well received by my family that I was inspired to try my hands at making some myself.


I made my first batch of egg tarts using this popular egg tart recipe by heimama (黑妈妈祖传蛋挞). Many thanks to Angel of Cook.Bake.Love who shared her experience in baking those easy and delicious egg tarts in her blog post.


As I wasn't sure whether I would be successful in my first attempt at making the egg tarts,  I omitted the custard powder that is called for in making the crust. Nevertheless, my first batch of egg tarts were a breeze to make and they turned out to be really good. This prompted me to get a pack of custard powder right away since I know I would be making these egg tarts again and again! The custard powder did wonders to the texture of the pastry crust. The pastry was more crisp (酥) and gave a melt in the mouth texture to the already very buttery and flaky crust. So, do include the custard powder if you are interested to make these egg tarts, or at least, substitute it with corn flour.


Making and baking the tarts was easy...the only problem I had was unmolding. I had made sure the pastry was above the rim of the mould and took extra care not to fill the crust with too much custard filling. I had also greased all the moulds with butter and so I would expect the tarts to release easily simply by inverting them. To my surprise, the tarts were all stuck to the moulds.  I tried 'shaking' one of them, hoping the tart would fall off, but it refused to budge. The original recipe says to give the tart a gentle knock to release it, but it didn't work when I tried knocking it against the table top. Maybe I was too gentle as I have this fear of breaking the tart into pieces. In the end, I tried tapping the base of the tart mould with a spoon, and voila, the tart dropped off from the mould. Just a whack or two will do the trick, lol!  (Updated as at 29 March: As advised by Angel, I baked another batch of egg tarts without greasing the moulds. After baking and once cooled, I tapped the tart mould against the table top, then inverted it and the tart released from the mould easily.)


This recipe is certainly a keeper. It is very straight forward as there is no unnecessary steps to pre-bake the crust. The custard filling didn't bubble up too much or burst even without adjusting or lowering the oven temperature during baking. I wasn't sure how to test the doneness since there was no instructions on this. I followed this method of inserting a toothpick into the custard, if it stands on its own, it’s done. I had also baked the tarts for another minute longer so that the crusts were lightly browned on the rim. Compared to other egg tart recipes, this heimama egg tarts use a lot less sugar for the pastry crust. As such, do not expect the crust to turn golden browned upon baking.


The wobbly filling was not too sweet nor taste eggy. It had a smooth and silky texture just like what many other bloggers have raved about. They were close or rather, even better than store bought ones. My elder child who loves egg tarts devoured half the batch and still looked forward to more. With this good experience and knowledge I have gained from baking these egg tarts, I am more confident to try other egg tart recipes. Next on my to-do list will be coconut tarts, do give me your recommendations if you have tried any good coconut tarts recipe :)


Egg Tarts (黑妈妈祖传蛋挞)

Ingredients:
(makes 10, tart mould size: 7cm diameter)

for the crust:
150g plain flour
1 tablespoon custard powder
1 tablespoon milk powder
100g butter, cold, cut into cubes
½ tablespoon caster sugar
½ large egg (about 25-30g), beaten
½ teaspoon vanilla extract (optional)

for the custard filling:
140g water
55g sugar (I used granulated sugar)
1½ large eggs, beaten
40g evaporated milk
½ teaspoon vanilla extract (optional)

Method:

for the custard filling:
  • Boil water and sugar till sugar dissolved. Let cool completely. Add beaten egg, evaporated milk and vanilla extract and mix well. Sieve 3 times. Set aside.
for the crust:
  • Sieve flour, custard powder and milk powder into a mixing bowl. Place cold, diced butter into mixing bowl. With a fork or a dough scraper, cut the butter into the flour mixture until it resembles coarse crumbs. 
  • Add in sugar, mix well. Make a well in the centre and add beaten eggs and vanilla extract (if using). Mix with hand until the mixture comes together to form a soft dough. (Note: do not over mix or knead the dough as it may cause gluten to develop and the crust may become tough and hard upon baking). Pat the dough into a round ball and flatten it to form a disc (Wrap with cling wrap and leave to chill in the fridge for at least 30 mins before use. 
  • Lightly grease each tart mould with butter. (Updated as at 29 March '14, it is not necessary to grease the tart moulds).
  • When ready to use, divide the dough into 10 portion (about 29~30g each). For each portion, roll dough into a ball, flatten to form a small disc and place into the tart mould. Press dough into the mould until the dough comes up to slightly above the rim. (Note: I hold the mould with both hands, then press the dough into the mould using my two thumbs while at the same time turning the mould with my other fingers in a clock wise direction, going round and round until the dough is evenly moulded to the tart mould.) Smooth the edges at the rim with fingertips to make it even.
  • Fill each tart with the fillings to 80~90% full or till it comes just below the rim. Bake in middle rack in preheated oven at 180 degC for 20 mins. Leave to cool on cooling rack. To unmould,  invert the mould on your palm and tap the base of the mould with a spoon. The tart should release and drop onto your palm tap/knock the mould on table table for a few times, invert the mould on your palm and the tart should release and drop onto your palm. Place a paper liner on the base of the tart (optionally) and invert it back. 
  • Egg tarts are best freshly baked. Any left overs can be stored in an airtight container in the fridge. Warm them in the oven and they will taste as good as freshly baked ones. 
Recipe source: Cook.Bake.Love

Thursday 13 March 2014

just 3 ingredients

Baking cheesecake is my achilles heel.


My previous attempt at making a Japanese soufflé cotton cheesecake failed miserably. Once out of the oven, it sank, shrank and developed a 'waist'. The texture was more like kueh lapis than cottony soft soufflé! I have since stayed clear of making another such cheese kueh until I saw this lovely soufflé cheesecake baked by Ann of Anncoo Journal.


I was very inspired after reading her post as her soufflé cheesecake requires only 3 ingredients. Even if I were to make a blunder again, I won't feel so bad since I would at most scarify just 3 ingredients. The original recipe was taken from this video recipe by Ochikeron. The clear step by step instructions helps to boost my confidence level too.


Since I have all three ingredients...eggs, white chocolate chips and cream cheese in my fridge, I didn't procrastinate but to bake the cake first thing the next morning. All went well until the cake was removed from the oven. It started to sink, as I had expected. I thought it was a complete failure again until I unmoulded it from the pan. It didn't look too bad despite the wrinkles on the surface, at least the cake didn't crack or form an obvious waist.


The texture of the cake was soft and moist. It was lighter than the usual Japanese cheesecake as only half a block of cream cheese is used. I didn't find the cake overly sweet either. I actually tasted the white chocolate and cream cheese mixture before adding in the eggs. I skipped the lemon zest and juice and replaced it with vanilla extract. I would most probably add in lemon juice if the mixture was too sweet for my liking.


This cake was a huge hit among my children. They wiped out more than half the cake in one siting and could have finished the whole cake if I wasn't there to stop them. The recipe is certainly a keeper and most importantly it is another milestone in my baking journey. I hope I could bake a better soufflé cheesecake in my next attempt...one that doesn't sink or shrink. May the force be with me.


3 Ingredients Soufflé Japanese Cheesecake

Ingredients:

125g cream cheese, cut into cubes, soften at room temperature
120g white chocolate, break into pieces (I used Ghirardelli white chocolate chips)
3 extra large eggs, cold, separated (I used 4 eggs with 60g yolks, 140g whites)

1 teaspoon vanilla extract (optional)

Method:
  1. Line the base of a 7" round cake pan(fixed base) with parchment paper and grease the sides with butter, set aside. 
  2. Separate the eggs and leave egg whites to chill in the fridge until ready to use, this helps ensure a more stable meringue.   
  3. Fill a saucepan with water to about half full. Bring the water to a full boil. Turn off the heat. Place white chocolate chips in a large mixing bowl and set it over the saucepan (make sure the bowl is bigger than the sauce pan). Stir chocolate till smooth. 
  4. Add cream cheese and mix till smooth.
  5. Remove mixing bowl from the saucepan. Add the egg yolks, with a balloon whisk, whisk to combine. Add vanilla extract (if using), whisk to combine, set aside.
  6. In a clean, dry mixing bowl, beat egg whites with an electric mixer until the egg whites reaches the stiff peak stage. (Take care not to over beat the egg whites. Since there is no sugar added, it takes a very short time to reach the stiff peak stage.)
  7. Add the beaten egg whites into the cream cheese mixture in 3 separate additions, each time fold with a spatula (I used a balloon whisk) until just blended.
  8. Pour batter into the prepared pan. Tap the pan lightly on a table top to get rid of any trapped air bubbles in the batter.
  9. Place cake pan in a baking tray. Fill the baking tray with some hot water. 
  10. Place on lower rack of the oven and bake at 170 degC for 15mins. Lower the temperature to 160 degC and bake for another 15 minutes. Turn off the oven temperature and leave the cake inside the oven for another 15 minutes.
  11. Remove cake pan from oven and leave the cake to cool before unmolding. Refrigerate for about 2 to 3 hours. Dust with icing sugar if desired.
Recipe source: from Anncoo Journal and this video by ochikeron.

Wednesday 5 March 2014

my green tea experiment


I made these blueberry and green tea muffins just so to used up some sweet blueberries and to try the matcha powder I bought during our trip to Jeju Island last december.


I bought the matcha powder from Osulloc tea museum in Jeju. It was a very nice and beautiful place! When I first came across pictures of this tea farm while I was planning for our self drive trip, I told myself I had to include it in our itinerary.


Even though it was a very hectic day covering the Cheonjiyeon Falls (one of the three famous water falls in Jeju); having a fun tim at the Alive Museum; a leisurely walk on the natural volcanic rocks along the magnificent Yeongmeori coast; we were glad to be able to make a pit stop at this lovely tea plantation. I didn't take any photos inside the museum and cafe as I was busy loading the shopping basket with tea leaves and souvenirs. It was a Sunday afternoon and the place was really crowded with locals. Since we were slightly behind time, we didn't sit down to try the famous green tea rolls at the museum cafe :'( We compensate with take-out green tea ice cream to enjoy while we walked around the museum compound. I also spent some time picking up Innisfree skin care products for my teenager's troubled skin. What to do, this mummy has made herself to believe that those products made with natural volcanic minerals will help her son to achieve flawless, blemish free skin just like the brand's ambassador, Lee Min Ho. Yes, there's a Innisfree house (store cum cafe) within the Osulloc tea museum. Do drop by this tea museum if you plan to visit Jeju Island, especially if you are a fan of green tea ;)


Now back to my baking lab. To minimise shortfalls, I used my all time favourite blueberry muffins recipe as base and added some matcha powder. Nothing too adventurous actually, but it was the first time I had tried match-making blueberries with green tea. A rather bold move coming from someone who has very low tolerance for any kitchen failures.


The recipe is so easy and straight forward that I was rewarded with a tray of sweet smelling homemade muffins within an hour.


The muffins domed and cracked beautifully...and...


they neither look weird nor taste odd as oppose to what I had imagined earlier.


The texture was...'muffin-perfect'...airy, coarse crumbs which tasted soft, fluffy, moist and wholesome. Thanks to my baking friend's heads up, the blueberries from the local supermarket were very sweet, and, whats more, they were on discount. I am sure gonna grab some more on my next trip to the store. It is a pity that the matcha flavour was a little on the subtle side (for me). Its presence was not so prominent but not to the extend of not being able to taste the unique green tea flavour. I didn't want to add too much matcha powder for fear that it will cause the muffins to come out dry. The blueberries and green tea goes well together, it is not a hit nor a miss. These muffins are certainly worth giving it a go if you were to develop a sudden muffin-crave and you happened to have all the ingredients on hand :)


Matcha Blueberry Muffins

Ingredients
(makes 12 regular size muffins)

240ml plain yogurt (regular or low fat)
1 large egg, lightly beaten
60ml canola oil
1 teaspoon pure vanilla extract
250g plain flour
1 tablespoon matcha green tea powder
1 teaspoon baking powder
1/2 teaspoon baking soda
1/4 teaspoon salt
100g granulated white sugar
100g fresh or frozen blueberries


Method:
  1. In a mixing bowl, whisk together the yogurt, lightly beaten egg, oil and vanilla extract until just combined.
  2. Sieve flour, matcha green tea powder, baking powder and baking soda into another mixing bowl. Add sugar, salt and whisk to combine.
  3. Remove 1 tablespoon of the dry ingredients and toss it with the blueberries (Note: If using frozen blueberries, do not thaw them).
  4. Pour the wet ingredients into the dry ingredients. With a rubber spatula, fold the wet ingredients into the dry ingredients and stir only until the ingredients are just combined (Note: stop stirring once the flour incorporates into the batter, but do check that there is no large pockets of flour at the bottom of the bowl). Gently stir in the blueberries. Do Not over mix the batter. The finished batter should appear thick and lumpy.
  5. Spoon batter into paper muffin cups, fill it to about 3/4 full.
  6. Bake in preheated oven at 190degC for about 20 - 25mins or until a toothpick inserted in the center of a muffin comes out clean. Transfer to a wire rack and let cool completely.
Recipe source: adapted from Joy of Baking.